Category Archives: Recipes

Cookies! Sables and Chocolate Chips

I’ll start with a confession.  Since we entered the early 21st century last week by finally buying a flat screen TV,  I have been watching more TV than usual.  The picture quality is remarkable.  A little overwhelming even.  To my eyes used to watching  an analog TV shaped like a cube, the detail seems almost too much.  It’s like I have hawk vision.

For example, in a scene in an elevator, where the viewer is supposed to be maybe 2 feet away from the actor’s face, not only could I see the downy hairs on her cheek, but I could also see the texture of the wallpaper on the elevator wall 3 feet behind her.  In real life, especially with these 40 mumble year old eyes, I wouldn’t have been able to make out either at those distances.

With all this extra viewing, I happened to bump into the “Cookie Jar” episode of America’s Test Kitchen.  There was Chris Kimball (who has remarkably smooth skin) rolling his eyes with pleasure as he munched on an improved chocolate chip cookie.  For the second recipe, they made sables (French butter cookies) which he proclaimed to be so good, that they landed in his top two favorite cookies.

With endorsements like those, I made both recipes this past week.  With a little on-line searching, I was able to find both recipes.  The sables were here, while the chocolate chip cookies were here.

The Sable Cookies (Sah-blas, if you don’t mind the outrageous accent):

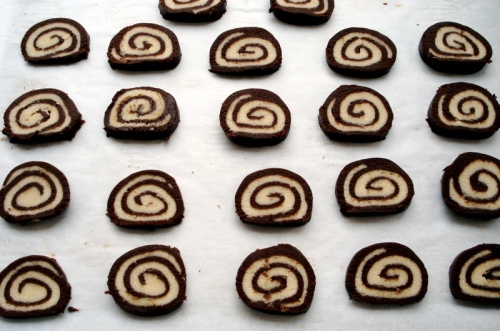
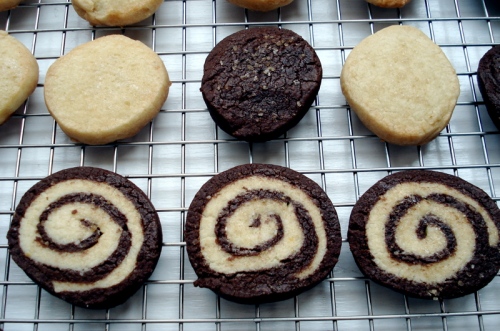
I made two doughs, one plain and one chocolate.  The chocolate one I improvised by reducing the flour to 5.25 ounces and adding 2.25 ounces cocoa powder (the plain cookies had 7.5 ounces flour).  I split each dough in half and made plain ones, chocolate ones and pinwheel ones.  I was particularly proud of the pinwheel cookies.  They looked beautiful (tip:  roll out the chocolate rectangle of dough slightly larger than the plain one) and were very tasty.

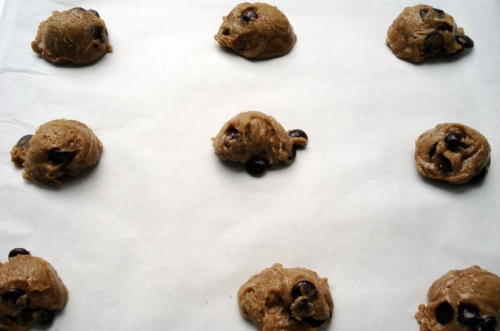
The Chocolate Chip Cookies

Chocolate chip cookies are a tricky thing.  Everybody uses the recipe on the back of the chocolate chip bag, and everybody’s cookies come out different.  And everyone likes the one they grew up with best.  So like everyone, my mom makes the best chocolate chip cookies.  Hers are thin, with crisp edges and chewy, bendy middles.  She adds walnuts.  She uses Crisco for the fat, rather than butter (I think this is a growing up in the Depression thing), she greases the cookie sheet, and she sifts the flour before she measures it.  I think all of these things combine to make a cookie with the texture I like.  If there were room for improvement in my mother’s recipe (I’m not saying that there is, Ma), it would be to use butter rather than Crisco.  I have tried this substitution, and I do like the flavor, but it messes with the texture.

Crisco is all fat, whereas butter is a mixture;  mostly fat with a little protein, and some water.  So when I substitute butter for Crisco, I am adding some water to the recipe, and I think that causes the unwanted texture change.

Interestingly, in the America’s Test Kitchen episode, they addressed this very issue.  They used all butter in their chocolate chip cookie recipe but reduced the moisture in the butter by melting it and boiling off the water.  Then they took it up a notch by carefully browning the butter to increase the flavor complexity even more.

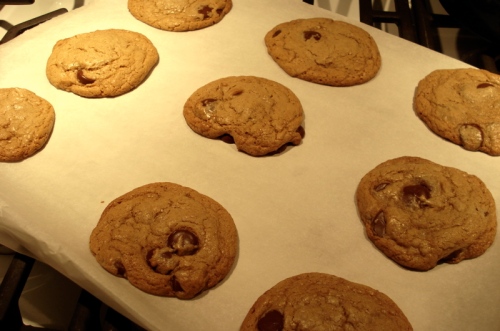
The result was a very, very tasty cookie.  Next time, I am going to reduce the flour a bit (to mimic my mother’s sifting) and perhaps cook them on a greased cookie sheet rather than parchment paper.

I didn’t put walnuts in the cookies because “WALNUTS ARE DISGUSTING!”*

So were the chocolate chip cookies better than my mother’s?  The flavor was very good.  Very very good, but I still have to tweak the texture.  Watch your back, Ma!

*Editorial comment by Thing One

Limeade Recipe

Summer for my daughters means the swimming pool is open for business.

Summer for me means fresh tomatoes.

Summer for my husband means his go-to drink becomes the Gin and Tonic.

For some of us especially, summer can’t come soon enough.

Limes were on sale this week at the grocery store (5 for $3, same for lemons), so I bought 10.  I knew that 10 limes worth of gin and tonics never ends well, so I looked up a limeade recipe so the girls could join Dada in their own way in the celebration of summer.

I’d like to point you to a very cool cooking site that speaks to me when I am just looking for the facts:  Cooking for Engineers.  Check out the recipe tab for a giant list of recipes that have been thoroughly tested and are written in a no-nonsense manner.  My husband is an engineer by training, and he often finds recipes confusing to follow.  He says they’re “too narrative”.  This is the site for him.

I was looking for a limeade recipe that I could make on a cup-by-cup basis and this is where I found it.  This recipe makes a simple syrup with lime juice concentrate which you then dilute with water to make the quantity you want.  Perfect.

Limeade (from Cooking for Engineers)

Limeade Concentrate:

1 cup lime juice (about 6 limes)

1.5 c water

1.5 c sugar

Squeeze the limes to get 1 cup of lime juice and put aside.  Combine the sugar and water in a saucepan and heat until the sugar is completely dissolved.  Remove from heat a cool a bit and then add the lime juice.  Store this concentrate refrigerated or frozen.

Limeade:

1 c limeade concentrate plus 2 cups water.  (or 1/3 c limeade concentrate + 2/3 c water…I is good at math)

On the site, the commenters suggested adding mint leaves or grated lime peel.  I did neither of these, but they both sounded great!  Adding little mint plus some white rum would make a great mojito-like drink.

Summer can’t come soon enough!

Orange Glow Chiffon Cake

In honor of spring, I made this happy, light, citrus-y cake for dessert.  Maybe I should have made it in honor of our chickens because it took a lot of eggs, and coincidentally, one of our chickens in named Chiffon.

Our chickens are lovely, and loving this spring weather after a long, cold, snowy winter.  This was our first winter with chickens, and I was worried how they would do in our unheated coop.  I didn’t have to worry a bit.

Our chickens are Buff Orpingtons; a big, beautiful winter hearty breed, and they were game to venture out of the coop in whatever winter decided to throw our way.  Snow, rain, sleet, freezing rain, hail would not keep them from their duty of pecking and scratching.  I wonder if the post office needs a new mascot?  I always thought that Zip Code guy was kind of creepy.

The only concession to the weather (or lack of daylight) the chickens made was they slowed their egg production between the end of December and the end of January.  Usually, our four hens give 3-4 eggs a day, but during the depths of winter they slowed to 1-2 eggs per day.

They picked up the pace during February, a month that to me suggests spring will never, ever come.  Like  a crocus poking through a snowdrift, the chickens reminded me that we were on the backside of winter.

And strangely enough, on the first day of spring we had our first 4 egg day since before Christmas.  So thank you my beautiful hens for reminding me that spring was coming when everything around us was suggesting otherwise.  And thank you for letting me make this egg-rich cake.

This was another Rose Levy Beranbaum recipe, this time from her classic cookbook, The Cake Bible.  The Cake Bible has all manner of cakes in it, from simple coffee cakes through large wedding cakes and everything in between.

The cake I made, the Orange Glow Chiffon Cake, is a typical chiffon cake.  You separate a bunch of eggs, and make meringue out of the whites and a rich yellow batter out of the yolks, and then combine the two with some gentle folding.  Pop the batter into a tube pan and bake.

This cake is infused with orange flavor due to the addition of both orange juice and orange zest in the batter.  It smells great making it, and even better as it’s baking.

A very similar cake is in RLB’s new cookbook, Rose’s Heavenly Cakes.  Marie, at the blog Heavenly Cake Place, has been doing a bake-a-long through this cookbook, and a cake very similar to this one was baked this week.  At Marie’s blog, you can check out her success with this cake and also click over to all the other folks who made this cake.  It’s a very cool blog and fun to see different interpretations of the same recipe.

After making and baking this simple cake, it finishes up with a stressful step:  cooling.  A chiffon cake is so delicate before it cools, it can become crushed by it’s own weight.  Because of this, it is cooled upside down on the neck of a bottle.  This uses gravity to help the cake maintain its height until the crumb cools and it becomes less of a girlie-man.

I am always a little nervous flipping it upside down, and nervous that someone (Thing 1, Thing 2, Cat etc) will knock it over.  No worries this time, it came out beautifully.

I topped it with some orange-scented whipped cream and it was a nice finish to dinner with a guest at Casa de Pollo Loco.

Thanks hens (especially you Chiffon)!

Sticky Buns!

For breakfast with friends this Sunday, I had a request to bring sticky buns.  Sticky buns are not in my repertoire, so I went to my no-fail source for a good recipe:  Rose Levy Beranbaum’s The Bread Bible.

RLB’s recipes always work for me, but I find them a teensy irritating (sorry, Rose).  Her recipes remind me of the way some people give driving directions.  I call them “up a hill-down a hill” directions.  I’m almost positive RLB gives up a hill-down a hill driving directions.

Me:  Hey Rose, can you tell me how to get to Tom’s house?  I need to see him today.

RLB:  Sure, it’s easy.  Go to the bottom of your driveway and take a left.  Go past that house on the corner, you know, the one that always has the beautiful roses in June?  Go past that house, and you will come to a traffic light.  If you go left, that will take you to Tim’s house.  Did you know he was moving?  If you go right, you will go to that really good bakery with the gigantic muffins.  Don’t go left or right, just keep straight.  Then you will go up a hill, and down a hill, and you will come to a traffic light.  There is a Walmart and a bank.  Keep going.  At the next light, by the car dealership, take a left.  Go up a hill, and as you are going down the hill, look for a white mailbox on the left.  It says #14 in black letters.  That is Tom’s house.  But he isn’t home today.

Me:  Oh.  Thanks.  (My hand cramped up after “beautiful roses”, so I stopped writing everything down, and tried to just get the important stuff.  Unfortunately, because I was listening, editing and writing, I missed the whole “he isn’t home today” part.)

Other people (ahem, my husband) give “just the facts” directions.

Me:  Hey Honey, can you tell me how to get to Tom’s house?  I need to see him today.

Husband:  He’s not home today.

Me: Oh, thanks.  Wait!  Where are you going?  Can you give me directions so I can see him when he is home?

Husband:  Take a left.  Third light, left.  #14.

I like my recipes like I like my driving directions; I don’t want to be flooded with detail, but I do appreciate a few landmarks to let me know I haven’t taken a wrong turn.

But, for these sticky buns, I decided to suffer through the “up a hill – down a hill” because I knew I would get a fabulous result.

To ensure I wouldn’t get lost in the words, I pre-read Rose’s recipe and made a skeletal outline of the time points.

If I don’t do this, I sometimes find I have to stay up late because I didn’t see the “chill the dough for 4 hours” step until it is too late.

These sticky buns are made with brioche dough.  Brioche dough is rich with butter and eggs.

Another cookbook gives three recipe options for brioche based on increasing amounts of butter and calls them, poor man’s brioche, middle class brioche and rich man’s brioche.

RLB’s recipe for brioche falls in the middle class category.  But with the addition of caramel, cinnamon sugar and rum-soaked raisins however, it appears this bourgeoisie dough has won the lottery and spent it all on booze and strippers.

I made this recipe over three days (!).  On Friday, I made the brioche sponge and dough, let it rise a bit, and then wrapped it and put it in the fridge.

On Saturday morning, I made the filling, soaked the raisins and made the caramel.

Hey look!  It’s my new thermapen!

On Saturday afternoon, I assembled the sticky buns and put them in the fridge overnight for the final rise.

Good tip from Rose:  Use dental floss to cut the cylinder into 1″ buns.

On Sunday morning, first thing, I took them out of the fridge to warm up and finish rising.

Then (finally) I baked them.

I didn’t get a nice final photo of a sticky bun on a plate,  but they were delicious.

The buns were light and airy and the filling was flavorful.  The only change I would make for next time is to reduce the cooking time on the caramel.  It was a little too firm for my taste, but they were yummy just the same.

Sirloin Saloon Bread Update

Jennifer, a Had The Radish reader (can you believe it?), recently came into possession of an actual loaf of Sirloin Saloon bread, and as she said in the comments section “…it is the yummiest bread (she) had ever eaten…”

Comparing it to the pictures of my recipe attempt, she said the real loaf was extremely heavy, dense, appeared darker and had a lot of seeds in it.  She then set off on her own journey to replicate the bread.

On her first attempt, she combined 4 different recipes and added soaked bulgar wheat to see if those were the “seeds”.  That wasn’t it.  On her next attempt, she nearly doubled the amount of rye flakes, and skipped the soaking step and used high gluten flour from the health food store, and eureka!  she got a result that was “extremely close to the original” although still a bit light in color to her eye.

She generously provided me with a picture of the real Sirloin Saloon bread (only half a slice, because, really, it doesn’t stick around waiting for pictures), and one of her copycat recipe.

Here is the real bread from the restaurant:

And here is a slice from the recipe she developed:

Lookin’ good!

Next batch I make, I’m going to increase the rye flakes and skip the soaking step (but adding a cup of water to the mix), and bake it at 400/350.  Thanks for your insight and thanks for having a conversation with me in the comments section about some yummy bread.

Here is a side by side comparison of the recipes:

(you can see Jen’s recipe method here, near the end of the comments)

Jen’s Recipe My Recipe
3tsp yeast 2.25 tsp yeast
2tbsp honey 1.5 tsp honey
4tbsp molasses 3 tsp molasses
4tbsp blackstrap molasses 3 tsp blackstrap molasses
1.5 cup hot water 1 cup hot water
1 1/4cups milk 1 1/3 cups milk
6 1/2 cups high gluten flour 6.25 cups flour
3 tsp salt 5 tsp kosher salt (2.5 tsp table salt)
2.5 c Rye Flakes 1 c Rye Flakes
1.5 T butter
Bake 400 for 10 min, then 350 for 30 min Bake 350 for 30-40 min

Happy Pi Day: Pizza Pie Recipe

Last Monday, I coached Thing One into creating a pizza from scratch.  She enjoyed the lesson so much, that she promptly went over to the calendar and wrote Pizza Night on all the Mondays.

In honor of her exuberance, and the fact that this Pizza Monday is also Pi day, I’ll share with you our pizza pie recipe.  Thing One is not into a lot of junk on her pizza, so these are old school, Neapolitan-style margarita pizzas.

I believe I got the original outlines for the dough and sauce recipes from this this crazy pizza genius.  This is a guy who had moved to Atlanta, but whose very bones ached for a slice of Patsy’s NYC pizza.  His only choice in this pizza desert was to spend 6 years (!) perfecting a recipe that could duplicate this Neapolitan style pizza in his home kitchen.  Of course, he had to clip the door lock off his oven so he could cook his pizzas in 2-3 minutes at a temperature known as the “self-cleaning cycle”, but he reached his pizza Nirvana.  I am not as passionate about my pizza, so I cook it on a stone at 550 degrees for about 7 minutes.

The simple recipe is at the end.

Dough:

First, combine 740 gm of flour with 624 gm water.  Mix this together until the flour is as evenly wetted as possible, and then let it sit for 20 minutes.

Meanwhile, add 9 gm active dry yeast and 21 gm salt to 220 gm flour, and mix to combine.  After the 20 minutes has passed, add the remaining flour mixture to the dough by a combination of mixing and kneading.

Stand on a chair, and knead for about 5 minutes until a smooth ball is formed.

Let the dough rest for 15-20 minutes.  Divide the dough into 4 x 400 gm balls.

You can now refrigerate these dough balls for 1-6 days in the refrigerator.  Place the dough in individual small plastic containers, lightly oiled and with a lid.  When you are ready to use them, remove them from the fridge, and let them sit at room temperature for about 1.5 hours, until they have risen about 50%.

If you want to use the dough immediately, let the dough balls sit, covered with a lightly damp cloth, until risen about 50% (about 30-45 minutes).  During this rise, preheat your oven with a pizza stone in it to 550 degrees (or as high as it will go).

Sauce:

Open a 28oz can of San Marzano plum tomatoes.

Pour the contents of the can through a strainer into a bowl.  Take each tomato, open it and with your fingers remove most of the seeds and discard.  Place the tomato flesh in the bowl with the juice.  Once the tomatoes are mostly de-seeded, rub any remaining pulp through the strainer into the bowl and crush the tomatoes in their juice by hand.

Add about 1-2T olive oil to a saucepan and when hot, add 2 cloves of garlic and a very small pinch of red pepper flakes.

Heat until you can smell the garlic and then add the de-seeded tomatoes and juice to the saucepan.  Add a leaf or two of torn basil.  Simmer for 10-15 minutes.  Taste and add a small pinch of sugar if it tastes bitter.   Remove from heat.

Assembly:

Take a ball of dough and pat it into a circle.  Pick up the circle, and holding it by the edge, gently stretch and pinch the dough making the circle larger and the dough thinner.  Then, draping the dough on the back of my hands, I stretch it further.  My assistant demonstrates.

I quickly move my hands around the edge of the circle and the weight of the dough hanging down helps to stretch it.   Again, to my able assistant.

This method also leaves the edge of the dough a little thicker for a nice crust.  I don’t make the dough much larger than 13″ in diameter because it will be too thin, and it also won’t fit on my pizza stone!

If the dough really resists the shaping, and seems to spring back, let it rest on the counter for 5 minutes or so and it will relax a bit and then continuing with the stretching.

Prepare a pizza peel (or rimless cookie sheet) by sprinkling cornmeal on it.  The cornmeal will act like little ball bearings and allow the pizza to easily slip onto the stone for baking.  Place the dough on the peel and top it evenly with a bit of sauce.  Don’t use too much, or the pizza will be soggy in the middle.  I then top it with a sprinkling of fresh chopped basil, followed by shredded mozzarella cheese (part skim, shredded at home) and grated Parmesan cheese.  I put the basil under the cheese so it won’t burn in the oven.  I think I will be out of a job soon…

Ready for the oven!

Slide the pizza from the peel onto the stone with a quick jerk (be brave and assertive, and it will slide right off). Cook for about 5-7 minutes, watching carefully those last couple of minutes.

(Capture  blurry picture of pizza in 550 degree oven.  Remember to draw in eyebrows tomorrow.  Ouch.)

I like the cheese lightly browned, and the crust with a light char on the underside.  This is a teensy pale.

While the first pizza is cooking, I prep the second one.  I take the first pizza out of the oven and place it on a cooling rack for a minute or two before cutting.  I think this helps keep the bottom crust crisp.  I using a cookie sheet as a peel (or big spatula) to get the pizza out of the oven, since the peel now has the next uncooked pizza on it.  Slide the next pizza in the oven, and continue until you are out of ingredients.  The cook eats her pizza while standing in the kitchen assembling pizzas and watching them cook.

Recipe:

960 gm flour

624 gm water, warmed

21 gm kosher salt

9 gm active dry yeast

1 28 oz can San Marzano tomatoes, seeded, and crushed by hand

1T olive oil

2 cloves garlic

small pinch of red pepper flakes

pinch of sugar (optional)

1/2 pound half skim mozzarella cheese (shredded at home)

1/4 – 1/3  c Parmesan cheese, grated

Basil leaves, torn into small pieces

Few tablespoons of cornmeal

Combine 740gm flour with all the warm water, mix and set aside for 20 minutes.  Combine remaining flour, salt and yeast.  Mix into dough, and knead for 5 minutes.  Divide into 4 equal sized dough balls, and place in lightly oiled container.  Keep in refrigerator for 1-6 days.  Remove from refrigerator and keep at room temperature about 1.5 hours to warm up and rise about 50%. If you decide to use the dough immediately (ie no refrigeration), let the dough rise, covered with a damp towel for 30-45 minutes, until increased about 50%.  Shape dough into 13″ diameter circles.  If dough resists shaping, let it rest on the counter for 5-10 minutes to relax, and then continue shaping.  Place dough on a peel (or rimless cookie sheet) prepared with a sprinkling of cornmeal.  Top dough with sauce (see below) and other toppings.  Slide onto pizza stone, and bake at 550 degrees for 5-7 minutes, watching carefully for the last couple of minutes.

Sauce:

Seed canned plum tomatoes and crush by hand.  Heat olive oil in a medium saucepan.  Add garlic and red pepper flakes and heat until you can smell the garlic.  Add the tomatoes, pulp and juice to saucepan, and a few torn basil leaves and simmer for 10-15 minutes.  Add a pinch of sugar if necessary.

Recipe: Authentic Scottish Scones

My grandparents on my father’s side were Scottish.  I never knew my Grandfather, he was one of the few Vermont fatalities of the Hurricane of ’38,  but that is a story for another time.

My Gram died when I was just 8.  I have very few long memories of her, but I do have a few short, specific memories.  The skin on her upper arm was very soft and cool, and I liked to pat it and feel it jiggle.  Her eyes were sparkly and crinkly and kind.  If I try really hard, I can almost remember her laugh.  It was just a little chuckle.  But I can never really recall it; it remains just out of reach, like a word stuck on the tip of my tongue.  She always wore a dress and she drove a Volkswagen Beetle.  She had strong-smelling green pine soap in her bathroom and face cream in a little pink  container shaped like a rosebud and it smelled like roses.  She had a gigantic glass candy dish, and no matter how carefully you tried to sneak candy, the lid always clanked and she would say from the other room, “Take some candy if you would like.”

Once, I slept over and we played bingo.  When I would win, I would always get a prize.  The prizes were always Native American in theme; like a plastic Indian-head key chain, or a small beaded change purse.  I found out later that these were things that she had gotten in return for donations she had given to a Native American charity.

When I was sick with a cold, she would always make me a fruit basket and bring it to me.  It had an orange, an apple and a banana, but the best part was there were always a couple of comic books tucked inside.

Re-reading this, I see I have used the word “always” an awful lot.  I was going to edit them out, but I think that is the essence of what I remember about her, she was always…always kind, always soft, always loving, always predictable, always dependable, until the day she just wasn’t there anymore.  To me, it was shocking and unbelievable. It was as if, without warning, the sun just didn’t rise one morning.

My Gram had a few things she was known for baking.  Fudge, doughnuts, oatcakes and scones.  I don’t have her scone recipe, this is actually from my childhood neighbor, Mrs. Troup.  They must have been close to what my Gram made, because I remember my Dad saying, “I don’t know how an Italian woman can make such good Scottish scones.”

I make my scones two ways:  plain and with ginger and lemon.  The plain is traditional and what my Gram would have made.  The ginger-lemon variation is just me being uppity.

And a word on pronunciation.  In our family, we always pronounced them to rhyme with “gone”… skawn.  Everyone else pronounces them to rhyme with “bone”.  I was heartened to hear on a trip to Scotland that they too pronounced it “skawn”.  It was just another bit of evidence that those things they sell in Starbucks might not be recognized in the Highlands.  Sorry, I’ll get off my soapbox now.

Here’s how I make authentic Scottish scones, and a modern variation.   The recipe follows at the end.

For the ginger-lemon scones, I dice about 1/2c of crystalline ginger into a small dice, and grate the zest from one lemon.

I add the ginger and lemon zest to the dry ingredients.  The diced ginger is sticky, so I rub it into the dry ingredients to break up the pieces and coat them with flour to keep it from clumping.

Then I cut up the cold butter into small cubes.  The original recipe, typical of Scottish and depression-era frugality I think, called for “oleo”.

I then cut the butter into the dry ingredients until I get a mixture that looks like a combination of cornmeal and small peas.  Sometimes, I use my fingers a bit to incorporate the butter, but I am careful not to melt it.

Then I add buttermilk, and stir it until just combined.  The dough will be shaggy and a little sticky.

I turn it out onto the counter and knead it only once or twice to gather it together.

Then I lightly pat it into a circle about 8″ in diameter and about 1/2″ thick.  I prick the dough with a fork, and cut the circle into wedges using my bench knife.

I place the scones on an ungreased cookie sheet.

They should look a little bumpy and craggy.  That way, when they bake, they have lots of crisp edges.  If they look too smooth at this point, I worry that I overworked the dough and they may be tough.

Bake at 450 degrees for 10-12 minutes until they are nice and brown on the top.

The plain ones are quite plain, and good with a little jam.  The ginger lemon scones are also good with jam or on their own.

Authentic Scottish Scones

Preheat oven to 450 degrees.

2c flour

2 rounded T sugar

2 t baking powder

1/2 t baking soda

1/2 t salt

Combine these ingredients.

1/3 c butter, cut into small cubes

Cut this into the dry ingredients.

3/4c buttermilk

Add the buttermilk and stir until just combined.  Turn out onto a counter and knead once or twice to bring dough together.  Quickly and gently pat into an 8-9″ circle about 1/2″ thick.  Prick with fork and cut into 8ths.  Place on ungreased cookie sheet and bake 10-12 minutes.

Ginger-Lemon Variation

1/2 c crystallized ginger, cut into small dice

zest of 1 lemon

Add these ingredients to the dry ingredients.  Rub the ginger pieces in the flour to coat them with flour and keep them from clumping.  Proceed with the recipe as written.

My Take: Sirloin Saloon Bread

When I went to school in Burlington, there was a restaurant down the road in Shelburne called the Sirloin Saloon*.  It was a steakhouse, and had a salad bar and good steak tips, but to me, the outstanding thing was their bread.  It was dark and sweet and hearty.  They served it warm, and it was so good that they offered it sold as loaves to take home.  Seen whole, the loaves were big and round and rustic looking.  I think this was unusual for the mid-eighties.

I was remembering that bread a few years ago and wanted to make my own, but couldn’t find any recipe leads on-line.  I called the restaurant and spoke with someone in the kitchen.  This is how I remember the conversation going:

Me:  Hi.  I had your bread a number of years ago and really loved it.  I’ve since moved away and was wondering if you give out the recipe?

Him:  No.

Me:  Oh.  Well, if you don’t give the recipe, do you give hints?

Him:  Maybe.  Ask me.

Me.  Ok.  I remember it being dark and sweet.  Do you use molasses for the sweetener?

Him:  Yeah.  We use one to one to a half…dark molasses, light molasses and honey.

Me: (frantically scribbling):  I think it’s whole grain.  Do you use any rye flour?

Him:  No.  We use high gluten white and rye flakes.

Me:  Rye flakes?  What are rye flakes?

Him:  Like oatmeal.  Only rye.

Me:  Huh.  Rye flakes.  Is there any caraway or anise in it?

Him:  No.  It’s a pretty standard loaf.  Listen, I gotta go.

Me:  Ok, thanks a lot…love your (click) bread.

From these hints pulled from a laconic chef, I was able to reproduce, at least to my taste buds and memory, the Sirloin Saloon bread. Here’s how I did it (the full recipe is at the end of this post).

1. He said it was a “pretty standard loaf”.

I know from baker’s percentages that a standard dough is about 55-70% hydration, 2% salt, 1% yeast, and 8-16% sweetener.  For a Swedish limpa, the sweetener is 20% and for a Portuguese loaf is 22%.  I didn’t remember the bread being as sweet as Portuguese bread, so I decided to try 20%.  This information gave me a good start on the broad strokes of the recipe.

2.  The mysterious rye flakes

I had never heard of rye flakes, so I did an on-line search and found that they can be bought at beer brewing supply stores.  I went to my local brew store and got a two-pound bag.  The look a lot like old-fashioned oats, except they are firmer and darker.  In other recipes using oats in bread, you are told to soak them in hot water before combining them with the other ingredients so I decided to do the same thing with the rye flakes.

3.  He uses high gluten flour.

I don’t use high gluten (or bread flour), but I know it is 13.7% protein.  My King Arthur all-purpose flour is 11.7% protein.  I happened to have on hand (who remembers why) some vital wheat gluten.  So after doing some math, I found that if I added 3 grams of vital wheat gluten to every 100 grams of all-purpose flour, I could bring up the protein to 13.7%.

In the interest of full disclosure, I forgot to add the wheat gluten to my flour when making the recipe for this post!  It came out just fine, so I guess you can also use plain, old, all-purpose flour.

4: A ratio of 1:1:0.5 dark molasses: molasses: honey

I had regular (unsulphered Grandmother’s) molasses but never heard of dark molasses.  I again went on-line, but the only other type of molasses I could find was blackstrap molasses.  I got this at the grocery store.  It has a very different taste than regular molasses, stronger and less sweet.  It reminds me of black licorice.  So equal amounts of dark and light molasses, and half the amount of honey.

The recipe:

I knew from my honey oat bread, that 710 gm flour plus 114 gm oats makes dough enough for 2 loaves, so that is where I started:

My Sirloin Saloon Bread Recipe

I made my own high protein bread flour by combining 800 gm all-purpose flour plus 25 gm vital wheat gluten.  Just buy bread flour, it’s easier. (I used all-purpose flour on this batch, and it was fine.)

Combine:

114 gm (1 c) rye flakes

236 gm (1 c) boiling water

Let this soak until softened and cooled to about 110 degrees.

Add to softened rye:

710 gm  (about 6.25 c) all-purpose flour

322 gm (1 1/3 c) milk, warmed to 110 degrees

The dough at this stage will look dry.

Combine and add to dough:

66 gm (3T) light molasses

66 gm (3T) blackstrap molasses

33 gm (1.5 T) honey

16 gm (5t) kosher salt

18 gm (1T) butter, melted

Finally add:

8 gm (1 pkg or 2 ¼ t) active dry yeast

Begin to mix the dough in earnest.  At this point it will be really sticky.

Knead dough in Kitchen Aid mixer until smooth (about 7-10 minutes).  I’ve never tried kneading this by hand, it starts out pretty sticky.

My advice would be if you want to knead it by hand, prepare to get messy and use a light hand when  flouring the counter.

Through the magic of kneading, it will turn into a smooth, slightly tacky dough.

Place the dough in a container, cover and let rise until double (about an hour).

Behold!  It has risen!

I ease it out of the dough bucket, knead it a couple of times and divide it in half.  I decide to make a loaf and a boule.  I spray the loaf pan with Pam, shape the loaf and place it in the pan.  For the boule, I round it into a ball shape, and using my hands and the counter, I tuck the sides of the boule under, stretching the surface of the dough tight.

I place the boule, seam side down on a floured cloth, and place it in a bowl to help it rise more up than out for this final rise.

I let the bread rise about 1.5 times (about an hour).

At the start of the final rise, I preheat the oven with a baking stone to 350 degrees.  It takes extra preheating time to get the stone nice and hot.  The only reason I’m using a stone is because I am baking a free-form loaf.  I slash the loaves…

and bake on the baking stone for 35-40 minutes.  In the above picture, I’ve put a little cornmeal on a baking sheet to serve as a peel to slide the boule onto the stone.  I don’t bake either of the loaves on a baking sheet.

The bread came out very good.  Hearty and sweet, with a little crunch on the crust.  The interior has a fairly tight, but soft crumb.

If I were going to tweak this recipe a bit more, I think I would try adding some whole wheat or rye flour to make it a little more hearty and not so soft.  Also, if I were baking only rustic loaves (ie. not in a pan) I would up the temperature to 400 degrees and maybe introduce a little steam at the start to make the crust darker and crustier.  All in all, I think this recipe is a very good approximation of the Sirloin Saloon bread I remember from the 1980’s..

My Take:  Sirloin Saloon Bread

114 gm (1 c) rye flakes

236 gm (1 c) boiling water

Combine and let this soak until softened and cooled to about 110 degrees.

Add to softened rye:

710 gm  (about 6.25 c) all-purpose flour (or bread flour)

322 gm (1 1/3 c) milk, warmed to 110 degrees

Combine and add to dough:

66 gm (3T) light molasses

66 gm (3T) blackstrap molasses

33 gm (1.5 T) honey

16 gm (5t) kosher salt

18 gm (1T) butter, melted

Finally sprinkle on top:

8 gm (1 pkg or 2 ¼ t) active dry yeast

Mix dough to combine, and then knead by machine until smooth, but still tacky (about 7-10 minutes).  Set dough aside to rise until doubled, about 40-60 minutes.  Knead dough a couple of times, divide in half and shape.  If making loaves, spray pan with cooking spray.  Set dough aside to rise about 1.5 times (about 45-60 minutes).  Preheat oven to 350 degrees during this final rise.  If making free-form loaves (not in a pan) bake on a baking stone, so make sure this is well pre-heated.  Bake bread for about 35-40 minutes.

*I just found that the Shelburne location has closed but it has locations in Rutland and Manchester

Our Daily Bread: Honey Oat

Well, it’s not really the daily bread anymore, but for a number of years before Thing 2 was born, I made our bread. We seem to eat a lot of bread around here with toast and sandwiches being a daily occurrence, so I would make a double batch of four loaves about every 10 days. I loved making our bread and have to say, I had the recipe and method down to a science.

Then I got pregnant with Thing 2. Ugh. Let’s just say we started buying bread. I fell out of love with making bread. I felt just too icky and exhausted. No more daily loaf, English muffins, pitas, artisanal boules, or wild-yeast sourdoughs. It was a dark time.

Now that Thing 2 is a happy toddler, I am trying to get back into the habit. My family misses eating our bread and I miss making it (and eating it). So to help me fall in love with making bread again, I would like to share with you my recipe and method for making our daily bread, a honey-oat loaf.

The Tools:

These are all the things I use to make our double batch of daily bread.  I have streamlined this recipe as much as possible to minimize the time it takes and reduce the clean-up time.  The only thing missing from the photo is my Kitchen Aid mixer.  You can, of course, make this recipe with other tools, and knead by hand and use measuring cups rather than a scale, I’m just showing you how I do it.

The Recipe:

Well, now that’s clear isn’t it.  I will write the recipe out at the end of the post, but I wanted to show you what my recipe looks like.  I think this recipe started from a Best Recipe Cookbook.  Since I am intrigued by artisinal breadmaking, I converted the original recipe amounts to weights and baker’s percentages and then I tweaked it lot from there.  If you would like to learn more about the fascinating and liberating method of bakers percentages, check out The Fresh Loaf in my blogroll.  No, really, it’s cool, and invaluable for designing and troubleshooting recipes, but I warn you it involves some math.  But it’s really cool!  Check it out.

Ok.  Now that’s out of the way, let’s go!

Making a Double Batch of Honey Oat Bread

Part 1:  Making the Dough

Since my Kitchen Aid mixer can’t handle mixing a double batch (4 loaves) of bread dough, I make two single batches (2 loaves each), and then combine them after the mixer step into one large batch.

First, I measure 320 gm milk into a glass cup.

Then I tare (zero) the scale and add 235 gm of water.

Then I repeat that in a second measuring cup, put them both in the microwave and heat them until they are warm (about 3 minutes in my microwave).

While the liquid is heating, I measure out 710 gm of flour and then add 114 gm of oats.  I use old-fashioned oats.

By now the liquid is warm to the touch, I estimate about 100-110 degrees, and I add it to the dry ingredients and stir it just to combine using my white scraper.  I set the first bowl aside and repeat the process with the second bowl.

Then I rinse out the measuring cups and throw in 1.5T butter (I use salted), and measure out 65-70 gm honey (I buy the cheapest I can find for this and save the good stuff for on top of the bread) and 15 gm salt (I use kosher).

I put the measuring cups back in the microwave and nuke about 45 seconds to melt the butter.

I add the honey-butter-salt to the dough and then add the yeast.  I use a scant tablespoon of yeast.

Then I put it in the mixer, mix it around a bit, change to the dough hook and knead for 5 minutes.  It transforms from this:

To this:

To finally this!

I do the same additions and mixing and kneading to the second batch of dough.  While the second batch is kneading, I use my bench scraper to cut the first batch into pieces.

Then when the second batch is done, I cut that into pieces too.  Then I combine all the pieces with a quick knead and the two batches of dough are combined into one large batch.

I put it into my dough bucket, and set it someplace warm-ish to rise.  It usually takes about 90 minutes to double in size.

A couple of notes here.  I don’t grease my dough bucket, I find with a little gentle coaxing the dough will release and slide out just fine.  I also am not very particular about finding a warm space for it to rise.  Long, cool rises are supposed to improve flavor, and if it isn’t doubled when I think it should be, I just let it have more time.  If I need the dough to be doubled in an hour, I’ll find (or make) a warm place to try and hurry it along.

This first part usually takes me 30 minutes.  This morning, taking pictures of everything, it took me about 45 minutes.  In that time I also fed Thing 2, fed the cat, ran to the basement for more flour, changed the battery in my thermometer (still not working), and answered a bunch of questions about why is mommy taking pictures of her dough.

Part 2:  Shaping and the Second Rise

Whoa.  I got so caught up in writing the first part of this post, I didn’t check the dough. Behold!  It had risen!

I use my flexible scraper to nudge and coax the dough onto a very lightly floured counter.

I give it a few quick kneads to deflate it a bit and re-distribute the yeast for the second rise.

I divide the dough as evenly as I can into quarters using my bench scraper.  Then I weigh each quarter, add some here, take some away there so that each piece is about 730 gm.  I weigh it on the lid of the dough bucket because I don’t like doing extra dishes.

I knead each weighed piece a couple of times to combine in any scraps,  lightly dust the counter with flour and begin shaping each loaf.  First, I pat it into a vague rectangle shape.  Then, starting on the edge facing away from me, I roll it onto itself, and pinch the seam shut.

I keep doing this until a log has formed, making sure to pinch each seam shut.  Then I karate chop the ends to pinch them.  My goal is to not tear the surface of the dough while doing this.  This is called the “gluten cloak”.  I think it is more important when making baguettes and other classic shapes.  You can see here there is a tear on the side and it looks a little shaggy.  No worries!

I turn the karate-chopped ends under, pinch them to seal, and it is ready for the pan.  I spray my loaf pans with cooking spray before putting in the bread.

I shape the remaining dough the same way and set the pans some place warm-ish to rise.  I let them rise until the top of the dough is about 1/2″ above the side of the pan.  This usually takes about an hour.  I don’t cover the dough while rising, I don’t find it necessary.  This second step of shaping the loaves only takes about 10 minutes.

Part 3:  Baking

Yay!  They rose.  I still get excited when my bread rises.  Let’s measure, shall we?  I’m a geek.

Ready for the oven!

I preheated the oven to 350 degrees sometime during the second rise.  I don’t bake the loaves on a baking stone or add steam or anything.  Just place them on the rack in your dirty oven.  You can also use a clean oven, but I am unfamiliar with this, and am not sure how they would fare.

Wow!  Look at that oven spring!  Quick, close the door!

Bake for about 40 minutes.  The bread should be golden brown, sound hollow when thumped, and if your thermometer is working, have an internal temperature of between 190 and 200 degrees.

Turn them immediately out of their pans onto a cooling rack.  Make sure they are fully cool before slicing.  Whatever you do, don’t eat a slice of warm bread with butter and honey!  The bread experts will tell you proper cooling is critical for bread quality.  If you can resist, you are a stronger person than I.

The Recipe:

Honey Oat Daily Loaf (makes 2 loaves)

710 gm white flour (about 5 2/3 c)

114 gm Old Fashioned Rolled Oats (about 1 c)

320 gm Milk (about 1 1/3 c)

235 gm Water (scant 1 c)

1.5 T Butter (salted)

70 gm honey (about 3T)

15 gm salt (kosher, about 2 3/4 tsp)

Scant T active dry yeast (or 1 foil pkg)

Combine milk and water and heat in microwave until warm to the touch (around 110 degrees).  Combine flour, oats and mix in water and milk.  Combine honey, salt and butter in microwave safe container and microwave until butter is nearly melted.  Add to dough.  Add yeast.  Mix to combine and then knead 5 minutes in Kitchen Aid mixer on level 2 (or knead by hand 8-10 minutes until smooth).  Place dough in container, cover and let rise until doubled, about 45 minutes.  Remove dough, lightly knead and divide into 2 even pieces.  Shape into loaf, and place, seam side down into a greased loaf pan.  Let rise in a warm space until crown of dough is about 1/2″ about pan (about 1 hour).  While bread is rising, preheat oven to 350 degrees.  Place bread in oven and bake about 40 minutes until done.  Remove from oven and immediately turn out onto cooling rack.